Thursday, December 21, 2017

How to Update Datasource Connect String ?

Scenario 1) Updating all datasource with same connect string 

===============================================

step a) create updateds.py file at $DOMAIN_HOME

dsURL="jdbc:oracle:thin:@(DESCRIPTION=(ADDRESS_LIST=(ADDRESS=(PROTOCOL=TCP)(HOST=localhost)(PORT=1521)))(CONNECT_DATA=(SERVICE_NAME=orcl)))"
print("*** Wait for a moment trying to connect *****")
connect('weblogic','xxxxxxx','t3://localhost:7001')
print("*** Connected *****")
cd('Servers/AdminServer')
edit()
startEdit()
cd('JDBCSystemResources')
for tmpDS in allDS:
  dataSourceName=tmpDS.getName();
  print  'changing datasource connect string for', dataSourceName
  cd('/JDBCSystemResources/' + dataSourceName + '/JDBCResource/' + dataSourceName + '/JDBCDriverParams/' + dataSourceName)
  cmo.setUrl(dsURL)
  print("*** connect string changed for your: ", dataSourceName)
  print ('')
  print ('')
save()
activate()


step b) Execute updateds.py script using below commands
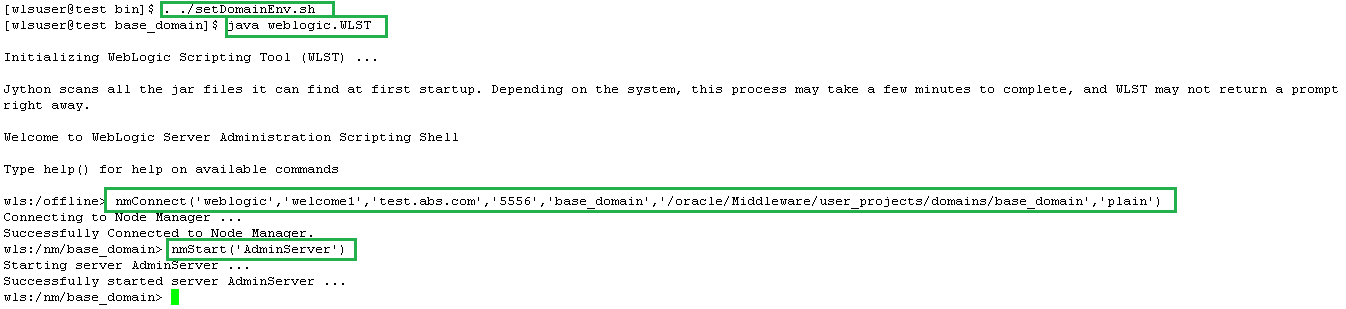
cd $DOMAIN_HOME/bin
. ./setDomainEnv.sh
java weblogic.WLST updateds.py

Scenario 2) Updating Single datasource(ex: SOADS) with specified connect string(ex: dsURL)

=========================================================

step a) create updateds.py file at $DOMAIN_HOME

dsURL="jdbc:oracle:thin:@(DESCRIPTION=(ADDRESS_LIST=(ADDRESS=(PROTOCOL=TCP)(HOST=localhost)(PORT=1521)))(CONNECT_DATA=(SERVICE_NAME=orcl)))"
print("*** Trying to Connect.... *****")
connect('weblogic','xxxxxxx','t3://localhost:7001')
print("*** Connected *****")
cd('Servers/AdminServer')
edit()
startEdit()
dsName="SOADS"
cd('JDBCSystemResources')
print  'changing datasource connect string for', dsName
cd('/JDBCSystemResources/' + dsName + '/JDBCResource/' + dsName + '/JDBCDriverParams/' + dsName)
cmo.setUrl(dsURL)
print("*** connect string changed for your: ", dsName)
print ('')
print ('')
save()
activate()

Step b) Execute updateds.py script using below commands

cd $DOMAIN_HOME/bin
. ./setDomainEnv.sh
java weblogic.WLST updateds.py

Thursday, March 2, 2017

How to resolve issues related to Errors: 1) connection limit (1) exceeded 2) Too Many Open files error & 3) native OutOfMemory ?

Problem Definition:-
================

Usually these type of errors will be seen in WebLogic, WebSphere, Tomcat logs due to Unix resource exhaustion ie. when soft limit of the open file descriptor crossed the specified limit value.


Before increasing the open file descriptor limit just check is there any process holding lock for deleted log files by using lsof command. 

Solution-1) Increase the open file descriptor value temporarily at user session level.


Example: 

ulimit -n    #command for checking current value of file descriptor 
ulimit -n  8192  # Command for increasing file descriptor value


Solution-2) Increase the file descriptor limit using WebLogic commEnv.sh upto 12.1.3 OR commBaseEnv.sh from 12.2.1.1.0 on wards.


Change from 4096 to higher value


Similar to below


Solution-3) Change the soft limit of file descriptor using /etc/security/limits.conf


Current value: 4096 for wlsuser


login to root user & Add OR update /etc/security/limits.conf with below content at the end of file.Save & Close the file.

wlsuser soft nproc 2047
wlsuser hard nproc 16384
wlsuser soft nofile 8192
wlsuser hard nofile 65536


Now login to wlsuser & check the value of file descriptor


Tuesday, February 28, 2017

How to Automate WebLogic Domain Restart? When Physical or Virtual Linux Server Restart

==> This Method is very Useful in below Scenarios


 When Physical/Virtual  Linux Servers Crashed and You Brought Up Linux Server at the Same Time WebLogic Servers Also Started Without Manual Intervention.


During Maintenance of Linux Servers, If Your Restarting Linux Server in that case also WebLogic Application Servers will be Started Automatically by Using this Method.


If WebLogic Server Crashed Due to OOM(OutOfMemory) OR Due to any JVM BUG in that case also JVM will be restarted automatically. 

Summary:
========

1) Create nodemanager Script
2) Save the Script Inside Directory /etc/init.d

3) Issue the Command chkconfig for Script nodemanager

4) Change Properties Values in nodemanager.properties File
5) Start the NodeManager, AdminServer & Managed Server Through NodeManager
6) For Testing Purpose Restart the Linux Server & Check WebLogic Application Server Status.


STEPS:-
=======

Step-1) Create nodemanager Script 


     Create nodemanager file with below content & Change highlighted things as per your environment standards .

#!/bin/sh
# chkconfig:   345 85 15

# description: Oracle Weblogic NodeManager service
. /etc/rc.d/init.d/functions

export export DOMAIN_HOME="/oracle/Middleware/user_projects/domains/base_domain"
export JAVA_HOME="/oracle/java/jdk1.8.0_112/bin/java"
export WL_HOME="/oracle/Middleware/Oracle_Home/wlserver"
DAEMON_USER="wlsuser"
PROCESS_STRING="^.*/oracle/Middleware/Oracle_Home/.*weblogic.NodeManager.*"

source $WL_HOME/server/bin/setWLSEnv.sh > /dev/null
export NodeManagerHome="$DOMAIN_HOME/nodemanager"
NodeManagerLockFile="$NodeManagerHome/nodemanager.log.lck"

PROGRAM="$DOMAIN_HOME/bin/startNodeManager.sh > $NodeManagerHome/nodemanager.out 2>&1"
SERVICE_NAME=`/bin/basename $0`
LOCKFILE="/var/lock/subsys/$SERVICE_NAME"

RETVAL=0

start() {
        OLDPID=`/usr/bin/pgrep -f $PROCESS_STRING`
        if [ ! -z "$OLDPID" ]; then
            echo "$SERVICE_NAME is already running (pid $OLDPID) !"
            exit
        fi

        echo -n $"Starting $SERVICE_NAME: "
/bin/su $DAEMON_USER -c "$PROGRAM &"

        RETVAL=$?
        echo
        [ $RETVAL -eq 0 ] && touch $LOCKFILE
}

stop() {
        echo -n $"Stopping $SERVICE_NAME: "
        OLDPID=`/usr/bin/pgrep -f $PROCESS_STRING`
        if [ "$OLDPID" != "" ]; then
            /bin/kill -TERM $OLDPID
        else
            /bin/echo "$SERVICE_NAME is stopped"
        fi
        echo
        /bin/rm -f $NodeManagerLockFile
        [ $RETVAL -eq 0 ] && rm -f $LOCKFILE

}

restart() {
        stop
        sleep 10
        start
}

case "$1" in
  start)
        start
        ;;
  stop)
        stop
        ;;
  restart|force-reload|reload)
        restart
        ;;
  condrestart|try-restart)
        [ -f $LOCKFILE ] && restart
        ;;
  status)
        OLDPID=`/usr/bin/pgrep -f $PROCESS_STRING`
        if [ "$OLDPID" != "" ]; then
            /bin/echo "$SERVICE_NAME is running (pid: $OLDPID)"
        else
            /bin/echo "$SERVICE_NAME is stopped"
        fi
        RETVAL=$?
        ;;
  *)
        echo $"Usage: $0 {start|stop|status|restart|reload|force-reload|condrestart}"
        exit 1
esac

exit $RETVAL

Step-2) Save the Script Inside Directory /etc/init.d


mv nodemanager /etc/init.d/


Step-3) Issue the Command chkconfig for Script nodemanager


chkconfig --add nodemanager


 Note:-
 Default-Start: 3,4,5=on
 Default-Stop: 0,1,2,6=off


Step-4) Change Properties Values in nodemanager.properties File


        a) Navigate to NodeManager Home


            cd $DOMAIN_HOME/nodemanager   

cd  /oracle/Middleware/user_projects/domains/base_domain/nodemanager
   

        b) Open the file nodemanager.properties using the vi editor

        c) Change the value of below parameters like below & Save and Exit


             NativeVersionEnabled=true
     CrashRecoveryEnabled=true
     weblogic.StartScriptEnabled=true


Step-5) Start the NodeManager, AdminServer & Managed Server Through NodeManager 


        a) Starting NodeManager

         
            nohup ./startNodeManager.sh &


       b) Start AdminServer through NodeManager using WLST.


     . ./setDomainEnv.sh

     java weblogic.WLST 


nmConnect('weblogic','welcome1','test.abs.com','5556','base_domain','/oracle/Middleware/user_projects/domains/base_domain','plain')

nmStart('AdminServer')


          c) Start Managed Server using WebLogic Admin Console OR WLST.


Step-6) For Testing Purpose Restart the Linux Server & Check WebLogic Application Server Status.


    With root user issue the below command for restarting linux server.

     init 6


 Post restart access the admin console & check weblogic servers status.


Tuesday, February 21, 2017

How To Increase Tomcat Performance Using Tomcat Native Library ?

The Apache Tomcat Native Library is an optional component for use with Apache Tomcat that allows Tomcat to use certain native resources for performance, compatibility, etc.


Specifically, the Apache Tomcat Native Library gives Tomcat access to the Apache Portable Runtime (APR) library's network connection (socket) implementation and random-number generator.


Summary

=============

1) Download Softwares APR library, OpenSSL libraries & Tomcat Native Library
2) Install APR library
3) Install OpenSSL libraries 
4) Install Tomcat Native Library
5) Add the Libraries Path to tomcat CLASSPATH
6) Restart Tomcat Server & Validate Libraries Loaded or Not at Run time.

Steps:
=====

1) Download Softwares APR library, OpenSSL libraries & Tomcat Native Library

Use Below links for downloading software's


Copy all setup files to remote machine using WinSCP


2) Install APR library

Extract the file apr-1.5.2.tar.gz using below command.

tar -zxvf apr-1.5.2.tar.gz


Use below commands for installation

cd /home/tomcat/native/apr-1.5.2

./configure --prefix=/home/tomcat/native/apr

make

make install

Note down the apr-1-config location, which will be used in next steps

/home/tomcat/native/apr/bin/apr-1-config 


3) Install OpenSSL libraries 


Extract the file openssl-1.0.2j.tar.gz using below command.

tar -zxvf openssl-1.0.2j.tar.gz

Use below commands for installation

cd /home/tomcat/native/openssl-1.0.2j

./config --prefix=/home/tomcat/native/openssl -fPIC

make

make install

Note: For older versions after configure another additional step needed ie. "make depend"


4) Install Tomcat Native Library

Extract the file tomcat-native-1.2.10-src.tar.gz using below command.

 tar -zxvf tomcat-native-1.2.10-src.tar.gz

Use below commands for installation

cd /home/tomcat/native/tomcat-native-1.2.10-src/native


./configure --with-apr=/home/tomcat/native/apr/bin/apr-1-config  --with-java-home=/home/tomcat/java/jdk1.8.0_112 --with-ssl=/home/tomcat/native/openssl --prefix=/home/tomcat/instance1/apache-tomcat-8.5.9


make

make install

Output
=============

--------------------------------------------------------------------
Libraries have been installed in:
   /home/tomcat/instance1/apache-tomcat-8.5.9/lib

If you ever happen to want to link against installed libraries
in a given directory, LIBDIR, you must either use libtool, and
specify the full pathname of the library, or use the `-LLIBDIR'
flag during linking and do at least one of the following:
   - add LIBDIR to the `LD_LIBRARY_PATH' environment variable
     during execution
   - add LIBDIR to the `LD_RUN_PATH' environment variable
     during linking
   - use the `-Wl,-rpath -Wl,LIBDIR' linker flag
   - have your system administrator add LIBDIR to `/etc/ld.so.conf'

See any operating system documentation about shared libraries for
more information, such as the ld(1) and ld.so(8) manual pages.
--------------------------------------------------------------------

5) Add the Libraries Path to tomcat CLASSPATH

Append below line in JAVA_OPTION of setenv.sh file

cd /home/tomcat/instance1/apache-tomcat-8.5.9/bin

vi setenv.sh

-Djava.library.path=/home/tomcat/instance1/apache-tomcat-8.5.9/lib 


6) Restart Tomcat Server & Validate Libraries Loaded or Not at Run time.

cd /home/tomcat/instance1/apache-tomcat-8.5.9/bin

./shutdown.sh

./startup.sh

Now check logs:

cd /home/tomcat/instance1/apache-tomcat-8.5.9/logs

vi catalina.out

22-Dec-2016 20:28:27.801 INFO [main] org.apache.catalina.core.AprLifecycleListener.lifecycleEvent Loaded APR based Apache Tomcat Native library 1.2.10 using APR version 1.5.2.

How to Start, Stop & Dissable Firewall in CentOS 7 using systemctl?

1) Below command is used for checking status of firewall

 systemctl status firewalld


2) Below command is used for starting firewall

 systemctl start firewalld


3) Below commands are used for Stopping &  Disabling firewall


systemctl stop firewalld
systemctl disable firewalld


Tar Command Examples

1) Creating tar files

    a) How to Create .tar file
   
        Below command creates uncompressed archive file.
     
        tar -cvf log.tar log


Options Meaning:

c – Creates a new .tar archive file.
v – Verbosely show the .tar file progress.
f – File name type of the archive file.


    b) How to Create .tar.gz OR .tgz files

        Below command creates compressed gzip archive file.Use z option

         tar zcvf logs.tar.gz logs/
   
    OR

    tar zcvf logs.tgz logs/


    c) How to create  tar.bz2 OR tbz OR tb2

        The bz2 feature compress and create archive file less than the size of the gzip 
        To create highly compressed tar file we use option as j.

        Below command is used for creating compressed archive file.

   tar jcvf logs.tar.bz2 logs/

   OR

   tar jcvf logs.tbz logs/

   OR

   tar jcvf logs.tb2 logs/


2) Extracting (untar) an archive using tar command


    a) Untar tar archive file using tar command
     
        x - Option is used for extract
     
        If you want untar in a different directory then use option as -C (specified directory).
     
     tar -xvf logs.tar 

   tar -xvf logs.tar -C /tmp/logs


      b) Extract tar.gz Archive File

           To Uncompress tar.gz archive file, just run following command. If would like to untar in                      different directory just use option -C and the path of the directory

     tar -xvf logs.tar.gz

     OR

     tar -xvf logs.tar.gz -C /tmp/logs/


        c) Extract tar.bz2 Archive File

            Below command is used for extracting compressed archive file tar.bz2

     tar -xvf logs.tar.bz2

     OR

     tar -xvf logs.tar.bz2 -C /tmp/logs/


3) List Content of tar Archive File

 
            t - Option is used for listing content of tar files.

     tar -tvf logs.tar

     tar -tvf logs.tar.gz

     tar -tvf logs.tar.bz2

4) Extract Single file from tar File


       a) Extract Single file from .tar File

           tar -xvf logs.tar logs/AdminServer.log


      b) Extract Single file from tar.gz File

          tar -zxvf logs.tar.gz logs/AdminServer.log


      c) Extract Single file from tar.bz2 File

          tar -jxvf logs.tar.bz2 logs/AdminServer.log


5) Extract Multiple files from tar, tar.gz and tar.bz2 File


  tar -xvf logs.tar logs/access.log logs/AdminServer.log

  tar -zxvf logs.tar.gz logs/access.log logs/AdminServer.log

  tar -jxvf logs.tar.bz2 logs/access.log logs/AdminServer.log

6)  Extract Group of Files using Wildcard


  tar -xvf logs.tar  logs/AdminServer.*

  tar -zxvf logs.tar.gz  logs/AdminServer.*

  tar -jxvf logs.tar.bz2  logs/AdminServer.*

  Note:- you can use this way also 
        tar -xvf logs.tar --wildcards *.xml

7)  Add Files or Directories to tar, tar.gz And tar.bz2 Files


      tar -rvf logs.tar ../../bin/setDomainEnv.sh

      Note: Only we can add files/directory to tar file


Tar Command Options:-

c – create a archive file.
x – extract a archive file.
v – show the progress of archive file.
f – filename of archive file.
t – viewing content of archive file.
j – filter archive through bzip2.
z – filter archive through gzip.
r – append or update files or directories to existing archive file.
W – Verify a archive file.
wildcards – Specify patters in unix tar command.

Log Files Rotated By WebLogic Server 12.1.2 OR 12.1.3 Are Not Closed


Issue Definition:
=============

lsof command for Middleware directory shows that log files rotated by Node Manager are not getting closed by file handler due to this space is not releasing.

[root@test1 ~]# df -h /dev/mapper/VolGroup00-LogVol06_Middleware
Filesystem Size Used Avail Use% Mounted on
/dev/mapper/VolGroup00-LogVol06_Middleware
50G 39G 8.1G 83% /oracle/Middleware

[root@test1 ~]# lsof -a +L1 /oracle/Middleware/|grep -i delete
java 5634 oracle 305w REG 253,6 5118896 921736 /oracle/Middleware/user_projects/domains/base_domain/servers/ms1/logs/ms1.out63956 (deleted)
java 5634 oracle 331w REG 253,6 5118902 921330 /oracle/Middleware/user_projects/domains/base_domain/servers/ms1/logs/ms1.out63708 (deleted)
java 5634 oracle 332w REG 253,6 5118898 921336 /oracle/Middleware/user_projects/domains/base_domain/servers/ms1/logs/ms1.out63709 (deleted)
java 5634 oracle 335w REG 253,6 5118902 921350 /oracle/Middleware/user_projects/domains/base_domain/servers/ms1/logs/ms1.out63710 (deleted)
java 5634 oracle 518w REG 253,6 5118902 921362 /oracle/Middleware/user_projects/domains/base_domain/servers/ms1/logs/ms1.out63711 (deleted)
java 5634 oracle 519w REG 253,6 5118898 921364 /oracle/Middleware/user_projects/domains/base_domain/servers/ms1/logs/ms1.out63712 (deleted)
java 5634 oracle 520w REG 253,6 5118897 921370 /oracle/Middleware/user_projects/domains/base_domain/servers/ms1/logs/ms1.out63713 (deleted)


Solution 1) Work Around


Restart the managed server ms1 for which files are deleted but space was not released

After restart space got released

[root@test1 ~]# df -h /dev/mapper/VolGroup00-LogVol06_Middleware
Filesystem Size Used Avail Use% Mounted on
/dev/mapper/VolGroup00-LogVol06_Middleware
50G 30.2G 19.8G 40% /oracle/Middleware


Solution 2) Permanent Fix


There is known Bug for the wls version 12.1.2 &  wls version 12.1.3 ie (Doc ID 2068841.1). apply this patch.

Active Directory Authenticator Configuration with Weblogic or AD Integration with Weblogic

Terminologies

CN: Common name =Users, Groups, Container, Computer
OU: Organisational Unit=Organisation Name
DC:Domain Component=Domain

Domain Controller: A domain controller is a server that is running a version of the Windows Server operating system and has Active Directory Domain Services installed.

Step 1) Create Users & Groups in Default AD container Users.


             Below snapshot shows i have created

             Users: jagan
                        john
                        scott

             Group: testgroup

Users jagan, john & scott are member of testgroup


Step 2) Create Active Directory Authenticator


Login to Wls console ==> Click on Security Realms ==> Click on myrealms ==> Click on Providers ==> Click on New ==> Enter below details & Click on OK

Name: TestADAuthenticator
Type: ActiveDirectoryAuthenticator


Step 2) Set the Control Flag to OPTIONAL to TestADAuthenticator 


Click on newly created AD Authenticator TestADAuthenticator ==> Configuration ==> Common
==> set Control Flag to OPTIONAL ==> Click on Save


Step 3) Now do the Provider Specific configuration for TestADAuthenticator 


Click on newly created AD Authenticator TestADAuthenticator ==> Configuration ==> Provider Specific ==> Provide Below Details & Click on Save

Host: 192.168.113.129
Port: 389
Principal: cn=jagan,cn=Users,dc=abs,dc=com
Credential: xxxxxxx
Confirm Credential: xxxxxxx
User Base DN: cn=Users,dc=abs,dc=com
Group Base DN: cn=Users,dc=abs,dc=com


Step 4) Place the TestADAuthenticator  at the top in providers table


Go to Providers table ==> Click on Reorder ==> select TestADAuthenticator   ==> Using up arrow place TestADAuthenticator  the at the top ==>Click on OK


Step 5) Set the DefaultAuthenticator Control Flag to OPTIONAL 

Go  To Providers Table ==> Click on DefaultAuthenticator ==> Configuration ==> Common ==>set Control Flag to OPTIONAL ==> Click on Save


Step 5) Restart the AdminServer


 cd /oracle/Middleware/user_projects/domains/base_domain/bin
./stopWebLogic.sh
nohup ./startWebLogic.sh &

Step 6) Login with user weblogic & check whether AD Users and Groups are imported or not.


Login to WLS console ==> Click on Security Realm==> Click on myrealms ==> Click on Users & Groups Tab==> Click on Users  ==> Click on Groups

Users:


Group:


Step 7) Assign the role to testgroup by adding it to role condition.

Login to WLS console ==> Click on Security Realm==> Click on myrealms ==> Click on Roles & Policy ==> Expand Global Roles ==> Exapnd Roles ==> Click on "View Role Conditions" against Admin ==> Click on "Add Condition"


Select Group against "Predicate List:" ==> Click on Next


Enter testgroup against "Group Argument Name:" ==> Click on Add ==>Click on Finish


 Click on Save


Step 8) Now logout from weblogic user and use the AD user jagan for login.


Friday, January 20, 2017

How To Improve WebLogic Server Start Up & Login Performance?

==> You may be noticed that the WebLogic Server start up performance is considerably very poor due to linux server Entropy issue

==> There are so many situation like WebLogic Console hanging after entering credentials an clicking on Login button & Slow Server Start up etc.

==> Entropy is the measure of the random numbers available from /dev/urandom, and if you run out,you can’t make SSL connections.


Step 1) Check the linux server Entropy using below command

         
             cat /proc/sys/kernel/random/entropy_avail

             If the o/p is between 100 to 200 in that case problem exist

             Example:


Step 2) set the JAVA_OPTION "-Djava.security.egd=file:/dev/./urandom" in setDomainEnv.sh file


Step 3) Restart the AdminServer 


cd /oracle/Middleware/user_projects/domains/base_domain/bin
./stopWebLogic.sh
nohup ./startWebLogic.sh &

Completed............

Wednesday, January 18, 2017

SQLAuthenticator Provider Configuration Demo With Weblogic

By default Users & Groups information's are managed using weblogic DefaultAuthenticator ie. Embedded LDAP. To manage application specific Users and Groups in efficient manner these information's will be stored in external LDAP like SQLAuthenticator, Active Directory, OID etc.


Step 1) Create Data Source sqlds which will used for while configuring SQLAuthenticator


Login to wls console ==> Click on Services ==> Click on Data Sources ==> Click on New ==>Click on Generic Data sources ==> Create sqlds datasource


Step 2) Create the following Tables "USERS", "GROUPS" and "GROUPMEMBERS" by running below sql queries


CREATE TABLE USERS (
    U_NAME VARCHAR(200) NOT NULL,
    U_PASSWORD VARCHAR(50) NOT NULL,
    U_DESCRIPTION VARCHAR(1000));
ALTER TABLE USERS
   ADD CONSTRAINT PK_USERS
   PRIMARY KEY (U_NAME);
   
CREATE TABLE GROUPS (
    G_NAME VARCHAR(200) NOT NULL,
    G_DESCRIPTION VARCHAR(1000) NULL);
ALTER TABLE GROUPS
   ADD CONSTRAINT PK_GROUPS
   PRIMARY KEY (G_NAME);
   
CREATE TABLE GROUPMEMBERS (
    G_NAME VARCHAR(200) NOT NULL,
    G_MEMBER VARCHAR(200) NOT NULL);
ALTER TABLE GROUPMEMBERS
   ADD CONSTRAINT PK_GROUPMEMS
   PRIMARY KEY (
      G_NAME,
      G_MEMBER
   );
   
ALTER TABLE GROUPMEMBERS
   ADD CONSTRAINT FK1_GROUPMEMBERS
   FOREIGN KEY ( G_NAME )
   REFERENCES GROUPS (G_NAME)
   ON DELETE CASCADE;

Step 3) Insert the following records in the Above Tables.


insert into USERS  values('jagan','welcome1','username is jagan stored in sqlauthenticator');

insert into GROUPS values('Administrators','This is an Administrators Group');

insert into GROUPMEMBERS values('Administrators','jagan');


Step 4) Create SQLAuthenticator authentication provider


Login to wls console ==> click on "Security Realms" ==> Click on "myrealm" ==> Click on Providers ==> Click on New ==> Enter Name "TestSQLAuthenticator" ==> Select Type SQLAuthenticator ==> Click on OK


Step 5) Configure SQLAuthenticator  provider


Click on newly created SQLAuthenticator ==> Click Configuration ==> Click on Provider Specific ==> Check the check box "Plaintext Passwords Enabled" ==> Enter data source name sqlds ==> Click on Save


Step 6) Setting Control Flag for SQLAuthenticator 


Click on newly created SQLAuthenticator ==> Click Configuration  ==> Click on Common ==> Control Flag OPTIONAL ==> Save


Step 7) Setting Control Flag for DefaultAuthenticator 


Go to Providers table ==> Click on DefaultAuthenticator ==> Click Configuration  ==> Click on Common ==> Control Flag OPTIONAL ==> Save


Step 8) Reorder providers


Go back to providers table ==> Click on Reorder ==> Select TestSQLAuthenticator ==> By using up arrows keep this provider at the Top ==> Click on OK


Step 9) Restart AdminServer


cd /oracle/Middleware/user_projects/domains/base_domain/bin
 ./stopWebLogic.sh

nohup ./startWebLogic.sh &

Step 10) Now login to Weblogic console using SQLAuthenticator user  jagan