Thursday, December 22, 2016

Cannot load /etc/httpd/modules/mod_wl_24.so into server: libopmnsecure.so: cannot open shared object file: No such file or directory

Issue Definition:-

  ==> All plugin files are copied to the apache module folder /etc/httpd/modules


  ==> In httpd.conf below line is added

    LoadModule weblogic_module  /etc/httpd/modules/mod_wl_24.so

  ==> Below issue occurs while loading WebLogic Pxoy Plugin 12.2.1.2.0  

          While executing "httpd -t"  OR "./apachectl -t"

[root@test2 conf]# httpd -t
httpd: Syntax error on line 60 of /etc/httpd/conf/httpd.conf: Cannot load /etc/httpd/modules/mod_wl_24.so into server: libopmnsecure.so: cannot open shared object file: No such file or directory
[root@test2 conf]#


Cause:-


 This issue occurs because link to shared library are not present


Solution :-

  a) Edit the file ld.so.conf by adding plugin module path /etc/httpd/modules

   vi /etc/ld.so.conf

   /etc/httpd/modules


  b) Execute below command

   ldconfig

  c) Now test the httpd syntax check.

   httpd -t  OR ./apachectl -t 


It Works!


For more information click on the link: http://www.cprogramming.com/tutorial/shared-libraries-linux-gcc.html

How To Rotate Apache error_log & access_log Logs?

There are two methods available for rotating Apache Httpd Server logs.

     1) Manual Log Rotation
     2) Log Rotation Using Piped Logs OR rotatelogs Utility

Method 1)  Manual Log Rotation 


By using a graceful restart, the server can be instructed to open new log files without losing any existing or pending connections from clients. However, in order to accomplish this, the server must continue to write to the old log files while it finishes serving old requests. It is therefore necessary to wait for some time after the restart before doing any processing on the log files

a) Rename access_log & error_log

  cd /etc/httpd/logs
  mv access_log access_log.old
  mv error_log error_log.old


b) Do the graceful restart of Apache & check whether new log files error_log & access_log generated or not.

  service httpd graceful


c) Zip old log files after some time because existing instructions are writing to old files.

  sleep 600
  gzip access_log.old error_log.old


For More Information Please refer link: https://httpd.apache.org/docs/2.4/logs.html#rotation

Method 2) Log Rotation Using  rotatelogs Utility (Piped Logs Method)


Apache httpd is capable of writing error and access log files through a pipe to another process, rather than directly to a file. In order to write logs to a pipe, simply replace the filename with the pipe character "|", followed by the name of the executable which should accept log entries on its standard input. The server will start the piped-log process when the server starts, and will restart it if it crashes while the server is running.

One important use of piped logs is to allow log rotation without having to restart the server. The Apache HTTP Server includes a simple program called rotatelogs for this purpose.


Syntax:

rotatelogs [ -l ] [ -L linkname ] [ -p program ] [ -f ] [ -t ] [ -v ] [ -e ] [ -c ] [ -n number-of-files ] logfile rotationtime|filesize(B|K|M|G) [ offset ]


To know more about Options click on link https://httpd.apache.org/docs/2.4/programs/rotatelogs.html


Example 1: Below option rotates access_log every 2 minutes (you can set your own time value) & create log file in the format access_log.yyyy.mm.dd.HH.MM


CustomLog "|/usr/sbin/rotatelogs /etc/httpd/logs/access_log.%Y.%m.%d.%H.%M 120" combined


Example 2: Below option rotates error_log for every 4KB (you can set your own size value).

ErrorLog "|/usr/sbin/rotatelogs /etc/httpd/logs/error_log.%Y-%m-%d-%H_%M_%S 4K"


For More Information Please Refere below Links:
https://httpd.apache.org/docs/2.4/programs/rotatelogs.html

https://httpd.apache.org/docs/2.4/logs.html#piped


Apache Log Format Common & Combined: https://httpd.apache.org/docs/1.3/logs.html#common

Nginx Reverse Proxy To Apache Http Server

Architecture Diagram 

==========================


Summary:
========

     1) Installing Nginx
     2) Installing Apache Http Server & Integrating With Tomcat Application Server
     3) Integrating Nginx with Apache Http Server
     4) Start the Nginx Server
     5) Testing the setup Using Nginx URL.


Steps
=====

1) Installing Nginx

Download Nginx Source Files using below URL

http://nginx.org/download/nginx-1.10.1.tar.gz

OR

https://www.nginx.com/resources/wiki/start/topics/tutorials/install/

Copy the File nginx-1.10.1.tar.gz to Remote Machine 192.168.52.129 using WinSCP


Untar the File nginx-1.10.1.tar.gz using below Command.

tar -zxvf nginx-1.10.1.tar.gz

Navigate to newly create directory ie. /root/nginx/nginx-1.10.1  & Run below Commands.

For more "Installation and Compile-Time Options" Please refer below link.

https://www.nginx.com/resources/wiki/start/topics/tutorials/installoptions/

cd /root/nginx/nginx-1.10.1

./configure --with-openssl=/usr/lib64/openssl

make 

make install


Configuration summary
==================

  + using system PCRE library
  + using OpenSSL library: /usr/lib64/openssl
  + using builtin md5 code
  + sha1 library is not found
  + using system zlib library

  nginx path prefix: "/usr/local/nginx"
  nginx binary file: "/usr/local/nginx/sbin/nginx"
  nginx modules path: "/usr/local/nginx/modules"
  nginx configuration prefix: "/usr/local/nginx/conf"
  nginx configuration file: "/usr/local/nginx/conf/nginx.conf"
  nginx pid file: "/usr/local/nginx/logs/nginx.pid"
  nginx error log file: "/usr/local/nginx/logs/error.log"
  nginx http access log file: "/usr/local/nginx/logs/access.log"
  nginx http client request body temporary files: "client_body_temp"
  nginx http proxy temporary files: "proxy_temp"
  nginx http fastcgi temporary files: "fastcgi_temp"
  nginx http uwsgi temporary files: "uwsgi_temp"
  nginx http scgi temporary files: "scgi_temp"


2) Installing Apache Http Server & Integrating With Tomcat Application Server

Please refer below URL for this Task

https://blogbyjagan.blogspot.in/2016/12/apache-tomcat-clustering-with-apache.html


3) Integrating Nginx with Apache Http Server

Navigate to the nginx.conf location

cd /usr/local/nginx/conf

Open the file nginx.conf & add the below content for proxying requests through Apache Webserver

vi nginx.conf

        location /examples {
             proxy_set_header X-Forwarded-Host $host:$server_port;
             proxy_set_header X-Forwarded-Server $host;
             proxy_set_header X-Forwarded-For $proxy_add_x_forwarded_for;
             proxy_store off;
             proxy_buffering off;
             proxy_pass http://192.168.52.161;
        }


4) Start the Nginx Server

cd /usr/local/nginx/sbin

./nginx

Note: Below command is used for stopping Nginx

./nginx -s stop

5) Testing the setup Using Nginx URL.

http://192.168.52.129/examples/


Apache Tomcat Clustering with Apache Http Server

Summary 

     1) Create OS User tomcat
     2) Install the JDK  & Export The JAVA_HOME in .bash_profile
     3) Install Tomcat Binaries in Two Directories instance1 & instance2
     4) Set JAVA_OPTIONS in setenv.sh file
     5) Install Apache Http Server
     6) Compile & Build Tomcat Connector for Generating mod_jk.so
     7) Load the mod_jk.so file in httpd.conf file located at /etc/httpd/conf
     8) Create workers.properties file with below content in Apache WebServer Machine
     9)  Load the worker.properties file & Other Entries in httpd.conf
   10)  Enter application context specific  entries in httpd.conf
   11)  Start up instance1,instance2 and apache WebServer.
   12)  Test the set up using WebServer URL


Steps
=====

1) Create OS User tomcat

     Use below command for creating user & setting password

     useradd -u 54666  tomcat
     passwd tomcat


2) Install the JDK  & Export The JAVA_HOME in .bash_profile

Download JDK using below link

http://www.oracle.com/technetwork/java/javase/downloads/jdk8-downloads-2133151.html

Use below command for installing jdk

tar -zxvf jdk-8u112-linux-x64.tar.gz


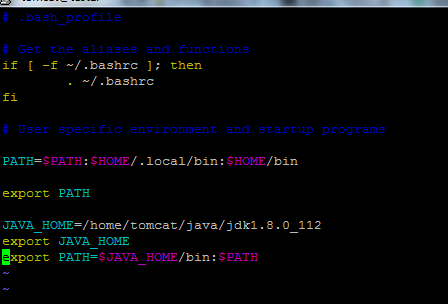
Set JAVA_HOME  by adding below lines in .bash_profile

vi ~/.bash_profile

JAVA_HOME=/home/tomcat/java/jdk1.8.0_112
export JAVA_HOME
export PATH=$JAVA_HOME/bin:$PATH


3) Install Tomcat Binaries & Export The CATALINA_HOME in .bash_profile

Download tomcat 8 using below link

https://tomcat.apache.org/download-80.cgi

Create two directories for two instances say instance1 & instance2

mkdir mkdir instance1 instance2


Install tomcat by executing below command in directories instance1 and instance2

 tar -zxvf apache-tomcat-8.5.9.tar.gz


4) Set JAVA_OPTIONS in setenv.sh file for instance1 & instance2

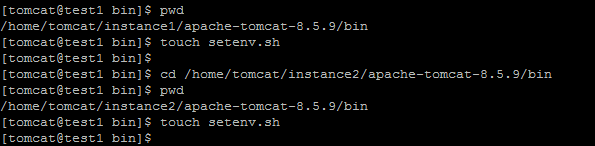
Create file setenv.sh

cd /home/tomcat/instance1/apache-tomcat-8.5.9/bin
touch setenv.sh

 cd /home/tomcat/instance2/apache-tomcat-8.5.9/bin
touch setenv.sh


Add below content to setenv.sh 

JAVA_OPTS="-Xms256m -Xmx512m "

Note: Java Options PermSize &  MaxPermSize are Deprecated in JDK8

5) Install Apache Http Server

Install Apache WebServer Using below link

https://blogbyjagan.blogspot.in/2015/10/wls-reading.html

OR Use below command for quick installation

yum install httpd

6) Compile & Build Tomcat Connector for Generating mod_jk.so  in Apache webServer Machine.

Download Tomcat Connector using below link

https://tomcat.apache.org/connectors-doc/

Using WinSCP copy the Connector file to the remote machine & untar it


navigate to directory /connector/tomcat-connectors-1.2.42-src/native & execute below command

cd /connector/tomcat-connectors-1.2.42-src/native

./configure --with-apxs=/usr/bin/apxs

make

make install

Now navigate to the directory /connector/tomcat-connectors-1.2.42-src/native/apache-2.0 & copy the mod_jk.so to /etc/httpd/modules

cd /connector/tomcat-connectors-1.2.42-src/native/apache-2.0
cp mod_jk.so /etc/httpd/modules

7) Load the mod_jk.so file in httpd.conf file located at /etc/httpd/conf

LoadModule jk_module        modules/mod_jk.so

8) Create workers.properties file with below content in Apache WebServer Machine

cd /etc/httpd/conf
touch workers.properties

Add below content in workers.properties file and Save & Exit

worker.list=instance1,instance2

worker.instance1.type=ajp13
worker.instance1.port=8009
worker.instance1.host=192.168.52.129

worker.instance2.type=ajp13
worker.instance2.port=8010
worker.instance2.host=192.168.52.129

worker.balancer.type=lb
worker.balancer.balance_workers=instance1,instance2

worker.stat.type=status
worker.list=balancer,stat

worker.ajp13.lbfactor=50
worker.ajp13.cachesize=10
worker.ajp13.cache_timeout=600
worker.ajp13.socket_keepalive=1
worker.ajp13.socket_timeout=300


9) Load the worker.properties file & Other Entries in httpd.conf 

JkWorkersFile /etc/httpd/conf/workers.properties
JkLogFile /etc/httpd/logs/mod_jk.log
JkLogLevel info
JkLogStampFormat "[%a %b %d %H:%M:%S %Y]"
JkOptions +ForwardKeySize +ForwardURICompat -ForwardDirectories
JkRequestLogFormat "%w %V %T"

10)  Enter below application specific  entries in httpd.conf 

JkMount /examples balancer
JkMount /examples/* balancer

JkMount  /status  stat


11) Now login to the tomcat machine & change instance1 and instance2 ports in server.xml file

cd /home/tomcat/instance1/apache-tomcat-8.5.9/conf/
vi server.xml

instance1: tomcat server port 8080, AJP port 8009, shutdown port 8005

cd /home/tomcat/instance2/apache-tomcat-8.5.9/conf/
vi server.xml
instance2: tomcat server port 8081, AJP port 8010, shutdown port 8006

11) Start up instance1,instance2 and apache WebServer.

On Tomcat Machine
==================
[tomcat@test1 bin]$ /home/tomcat/instance1/apache-tomcat-8.5.9/bin/startup.sh
Using CATALINA_BASE:   /home/tomcat/instance1/apache-tomcat-8.5.9
Using CATALINA_HOME:   /home/tomcat/instance1/apache-tomcat-8.5.9
Using CATALINA_TMPDIR: /home/tomcat/instance1/apache-tomcat-8.5.9/temp
Using JRE_HOME:        /home/tomcat/java/jdk1.8.0_112
Using CLASSPATH:       /home/tomcat/instance1/apache-tomcat-8.5.9/bin/bootstrap.jar:/home/tomcat/instance1/apache-tomcat-8.5.9/bin/tomcat-juli.jar
Tomcat started.
[tomcat@test1 bin]$


[tomcat@test1 bin]$ /home/tomcat/instance2/apache-tomcat-8.5.9/bin/startup.sh
Using CATALINA_BASE:   /home/tomcat/instance2/apache-tomcat-8.5.9
Using CATALINA_HOME:   /home/tomcat/instance2/apache-tomcat-8.5.9
Using CATALINA_TMPDIR: /home/tomcat/instance2/apache-tomcat-8.5.9/temp
Using JRE_HOME:        /home/tomcat/java/jdk1.8.0_112
Using CLASSPATH:       /home/tomcat/instance2/apache-tomcat-8.5.9/bin/bootstrap.jar:/home/tomcat/instance2/apache-tomcat-8.5.9/bin/tomcat-juli.jar
Tomcat started.
[tomcat@test1 bin]$


On WebServer Machine
==================
[root@test2 logs]# service httpd start
Redirecting to /bin/systemctl start  httpd.service
[root@test2 logs]#


12) Test the set up using below WebServer URL

http://192.168.52.161/examples/


Friday, August 26, 2016

Automatic JVM Upgarde in WebLogic 12.2.1.0.0 Without Disturbing End Users

Environment Details:
=================


1) Current JVM Version is  "1.8.0_65" and Planning to Upgrade it to "1.8.0_92"


2) Lets Place JVM Binaries "1.8.0_92" in Parallel With Old JVM on All Nodes.


3) Connect to AdminServer Using WLST

connect('weblogic','welcome1','t3://192.168.142.131:7001')


4) Execute Below WLST command for Upgrading JVM


progress=rolloutJavaHome('prod_domain','/oracle/jvm/jdk1.8.0_92')
progress.getStatus()

Note: Remember While Upgrading AdminServer Node Admin Console Will Not Be Available.After Upgrading JVM on Admin Node you will be able to access Admin Console(Everything Is Automatic Process)


5)  AdminServer node JVM is Upgraded to  "1.8.0_92" And Started Upgrading Managed Server ms2.


6) Managed Server ms2 Node JVM Upgraded to "1.8.0_92" And Started Upgrading Managed Server ms1.


7) JVM Up gradation Completed On All Nodes.


Wednesday, August 24, 2016

Perform SSH Login Without Password Using ssh-keygen & ssh-copy-id

Step 1: Create public and private keys using ssh-key-gen on host jagan.abs.com


[oracle@jagan ~]$ ssh-keygen
Generating public/private rsa key pair.
Enter file in which to save the key (/home/oracle/.ssh/id_rsa):Enter
Created directory '/home/oracle/.ssh'.
Enter passphrase (empty for no passphrase):Enter
Enter same passphrase again:Enter
Your identification has been saved in /home/oracle/.ssh/id_rsa.
Your public key has been saved in /home/oracle/.ssh/id_rsa.pub.
The key fingerprint is:
c9:31:0c:a6:b6:fc:ad:f7:bf:fa:a1:c5:b1:e5:24:11 oracle@jagan.abs.com
[oracle@jagan ~]$


Step 2: Copy the public key to sahiti.abs.com using ssh-copy-id


[oracle@jagan ~]$ ssh-copy-id -i ~/.ssh/id_rsa.pub sahiti.abs.com
28
The authenticity of host 'sahiti.abs.com (192.168.142.130)' can't be established.
RSA key fingerprint is d7:73:15:b9:17:e3:9b:2d:19:b8:13:9e:e8:a5:cd:ef.
Are you sure you want to continue connecting (yes/no)? yes
Warning: Permanently added 'sahiti.abs.com,192.168.142.130' (RSA) to the list of known hosts.
oracle@sahiti.abs.com's password:Enter password
Now try logging into the machine, with "ssh 'sahiti.abs.com'", and check in:

  .ssh/authorized_keys

to make sure we haven't added extra keys that you weren't expecting.

[oracle@jagan ~]$

Step 3: Login to sahiti.abs.com without entering the password

[oracle@jagan ~]$ ssh sahiti.abs.com
[oracle@sahiti ~]$


Completed...............

Tuesday, August 23, 2016

CFGFWK-60550: Encountered error: "Attribute "Password" is not set for user "weblogic"" during UNPACK in WebLogic 12.2.1.1.0


1) Pack the Domain prod_domain using below command


./pack.sh -domain=/oracle/Middleware/user_projects/domains/prod_domain -template=wls_template12211.jar -template_name="wls_template12211"


2) Now Create Another Domain Called test_domain Using Above Template wls_template12211.jar

 ./unpack.sh -domain=/oracle/Middleware/user_projects/domains/test_domain -template=/oracle/Middleware/oracle_common/common/bin/wls_template12211.jar -log_priority=ALL -log=test.log


Error From Log File test.log
=========================
2016-08-24 06:02:36,974 SEVERE [9] com.oracle.cie.wizard.internal.engine.WizardControllerEngine - Wizard error cause
com.oracle.cie.wizard.tasks.TaskExecutionException: CFGFWK-60550: Script execution aborted.
CFGFWK-60550: Encountered error: "Attribute "Password" is not set for user "weblogic"". Error is logged to "null".
CFGFWK-60550: See log for details.
        at com.oracle.cie.wizard.domain.silent.tasks.RunScriptTask.runScriptWithExecutor(RunScriptTask.java:645)
        at com.oracle.cie.wizard.domain.silent.tasks.RunScriptTask.execute(RunScriptTask.java:363)
        at com.oracle.cie.wizard.internal.cont.SilentTaskContainer$TaskRunner.run(SilentTaskContainer.java:97)
        at java.lang.Thread.run(Thread.java:745)
Caused by: com.oracle.cie.domain.script.ScriptException: Attribute "Password" is not set for user "weblogic"
        at com.oracle.cie.domain.script.ScriptExecutor.checkSecurityInfo(ScriptExecutor.java:5590)
        at com.oracle.cie.domain.script.ScriptExecutor.writeDomain(ScriptExecutor.java:1752)
        at com.oracle.cie.domain.script.ScriptParserClassic$StateMachine.processWrite(ScriptParserClassic.java:573)
        at com.oracle.cie.domain.script.ScriptParserClassic$StateMachine.execute(ScriptParserClassic.java:429)
        at com.oracle.cie.domain.script.ScriptParserClassic.parseAndRun(ScriptParserClassic.java:148)
        at com.oracle.cie.domain.script.ScriptParserClassic.doExecute(ScriptParserClassic.java:110)
        at com.oracle.cie.domain.script.ScriptParser.execute(ScriptParser.java:72)
        at com.oracle.cie.domain.script.ScriptParser.execute(ScriptParser.java:35)
        at com.oracle.cie.wizard.domain.helpers.Executor.runSilentScript(Executor.java:66)
        at sun.reflect.NativeMethodAccessorImpl.invoke0(Native Method)
        at sun.reflect.NativeMethodAccessorImpl.invoke(NativeMethodAccessorImpl.java:62)
        at sun.reflect.DelegatingMethodAccessorImpl.invoke(DelegatingMethodAccessorImpl.java:43)
        at java.lang.reflect.Method.invoke(Method.java:498)
        at com.oracle.cie.wizard.domain.silent.tasks.RunScriptTask.runScriptWithExecutor(RunScriptTask.java:575)


Solution 1) To Fix The Above Issue We Have To Pass Command Line Argument -user_name And -password To unpack.sh

./unpack.sh -domain=/oracle/Middleware/user_projects/domains/test_domain -template=/oracle/Middleware/oracle_common/common/bin/wls_template12211.jar -user_name=weblogic -password=xxxxxxx -log_priority=ALL -log=test.log


Solution 2) In This Case We Have To Create Wallet Using configWallet.sh And Pass The Same thing While Unpacking.


Create Wallet Using Below Command


./configWallet.sh -walletDir /oracle/wls1221/oracle_common/common/bin -create admin_name weblogic

Now Unpack, It Will Work.....


./unpack.sh -domain=/oracle/Middleware/user_projects/domains/test_domain -template=/oracle/Middleware/oracle_common/common/bin/wls_template12211.jar -walletDir /oracle/wls1221/oracle_common/common/bin -log_priority=ALL -log=test.log


Reference Document:

http://docs.oracle.com/middleware/12211/lcm/WLDPU/GUID-3C80A78F-891C-4767-B727-1E9372B125DF.htm#WLDPU143

COMPLETED................

Friday, August 19, 2016

How To Install Oracle WebLogic Server 12.2.1.1.0 Using Silent Mode ?

Summary 

     1) Create OS User and Group
     2) Create Required Directories
     3) Assign The Ownership and Permission To Directories
     4) Install the JDK and Export The JAVA_HOME in .bash_profile
     5) Prepare The Response file.
     6) Create The File oraInst.loc And add inventory_loc and inst_group
     7) Start The WebLogic Server Binaries Installation Using Silent Mode
     8) Create WebLogic Domain Using WLST.


1. Create OS User and Group

       groupadd -g 54321 oinstall
       useradd -u 54322 -g oinstall oracle
       passwd oracle


2. Create Required Directories 

       mkdir -p /oracle/Middleware
       mkdir -p /jdk/jvm


3. Assign The Ownership and Permission To Directories 

     chown -R oracle:oinstall /oracle
     chown -R oracle:oinstall /jdk
     chmod 775 /oracle
     chmod 775 /jdk


4. Install the JDK and Export The JAVA_HOME in .bash_profile

      su - oracle
      tar -zxvf jdk-8u92-linux-x64.tar.gz


export JAVA_HOME=/jdk/jvm/jdk1.8.0_92
export PATH=$JAVA_HOME/bin:$PATH


5. Prepare The Response file.

Create response file with below content (Note: change the ORACLE_HOME as per your environment need)


-----------------------------------------------------------------------------------------------------------
[ENGINE]

#DO NOT CHANGE THIS.
Response File Version=1.0.0.0.0

[GENERIC]

#Set this to true if you wish to skip software updates
DECLINE_AUTO_UPDATES=true

#My Oracle Support User Name
MOS_USERNAME=

#My Oracle Support Password
MOS_PASSWORD=<SECURE VALUE>

#If the Software updates are already downloaded and available on your local system, then specify the path to the directory where these patches are available and set SPECIFY_DOWNLOAD_LOCATION to true
AUTO_UPDATES_LOCATION=

#Proxy Server Name to connect to My Oracle Support
SOFTWARE_UPDATES_PROXY_SERVER=

#Proxy Server Port
SOFTWARE_UPDATES_PROXY_PORT=

#Proxy Server Username
SOFTWARE_UPDATES_PROXY_USER=

#Proxy Server Password
SOFTWARE_UPDATES_PROXY_PASSWORD=<SECURE VALUE>

#The oracle home location. This can be an existing Oracle Home or a new Oracle Home
ORACLE_HOME=/oracle/Middleware

#Set this variable value to the Installation Type selected. e.g. WebLogic Server, Coherence, Complete with Examples.
INSTALL_TYPE=Complete with Examples

#Provide the My Oracle Support Username. If you wish to ignore Oracle Configuration Manager configuration provide empty string for user name.
MYORACLESUPPORT_USERNAME=

#Provide the My Oracle Support Password
MYORACLESUPPORT_PASSWORD=<SECURE VALUE>

#Set this to true if you wish to decline the security updates. Setting this to true and providing empty string for My Oracle Support username will ignore the Oracle Configuration Manager configuration
DECLINE_SECURITY_UPDATES=true

#Set this to true if My Oracle Support Password is specified
SECURITY_UPDATES_VIA_MYORACLESUPPORT=false

#Provide the Proxy Host
PROXY_HOST=

#Provide the Proxy Port
PROXY_PORT=

#Provide the Proxy Username
PROXY_USER=

#Provide the Proxy Password
PROXY_PWD=<SECURE VALUE>

#Type String (URL format) Indicates the OCM Repeater URL which should be of the format [scheme[Http/Https]]://[repeater host]:[repeater port]
COLLECTOR_SUPPORTHUB_URL=

---------------------------------------------------------------------------------------------------------------


6. Create The File oraInst.loc And add inventory_loc and inst_group


Create The File /etc/oraInst.loc using root user And The Below Content Into It.

inventory_loc=/home/oracle
inst_group=oinstall 


7. Start The WebLogic Server Binaries Installation Using Silent Mode

Use below command for installing weblogic binaries in silent mode

 java -jar fmw_12.2.1.1.0_wls.jar -silent -responseFile /oracle/setup/wls12211.rsp -invPtrLoc /etc/oraInst.loc -force


8. Create WebLogic Domain Using WLST.

       a) Create the python script wls_prod_domain with below content

----------------------------------------------------------------------------------------------------------
# Select the template to use for creating the domain

selectTemplate('Basic WebLogic Server Domain','12.2.1.1')
loadTemplates()

# Set the listen address and listen port for the Administration Server

cd('/Servers/AdminServer')
set('ListenAddress','192.168.142.128')
set('ListenPort',7001)

#Enable SSL on the Administration Server and set the SSL listen address and Port

create('AdminServer','SSL')
cd('SSL/AdminServer')
set('Enabled','false')
set('ListenPort', 7002)

# Set the domain password for the WebLogic Server administration user

cd('/')
cd('Security/base_domain/User/weblogic')
cmo.setPassword('welcome1')

# If the domain already exists, overwrite the domain

setOption('OverwriteDomain','true')

# write the domain and close the template

writeDomain('/oracle/Middleware/user_projects/domains/prod_domain')
closeTemplate()
exit()

---------------------------------------------------------------------------------------------------------------


   b) Execute below WLST command for creating prod_domain.

         java weblogic.WLST wls_prod_domain.py


    c) Start the weblogic server using below command 

          cd /oracle/Middleware/user_projects/domains/prod_domain/bin
          nohup ./startWebLogic.sh &


    d) Access The weblogic console using below URL


Friday, July 15, 2016

How To Start Weblogic Managed Servers Using WLST?

Summary
  1. Connect To AdminServer
  2. Start Manager Server


1.Connect To AdminServer


Syntax:

wls:/offline> connect('adminusrname','adminpassword','AdminURL')

Example:

wls:/offline> connect('weblogic','welcome1','t3://192.168.145.128:7001')


//
///2./